
DIY & Crafts
Project Journal: Making a Terrarium

DIY & Crafts
Project Journal: Making a Terrarium
 First step: Go shopping. The
jars and gravel are from
Ikea; the charcoal is from
Home Hardware (look for it in the aisle with the fertilizers for houseplants); the plants and soil are from my local
Sobeys. I went to a couple florist shops but they didn't have what I wanted (or, at least, not for a price I was willing to pay). I washed the jars and let them dry overnight (I didn't want any mud!).
Step two: Cover the table with newspaper. That bag of charcoal had been sitting on a shelf in the HH basement for 20 years, I'm guessing, and it was
dirty! Also, well, giant bag of dirt + small-mouthed jar = likely disaster, at least when I'm involved.
First step: Go shopping. The
jars and gravel are from
Ikea; the charcoal is from
Home Hardware (look for it in the aisle with the fertilizers for houseplants); the plants and soil are from my local
Sobeys. I went to a couple florist shops but they didn't have what I wanted (or, at least, not for a price I was willing to pay). I washed the jars and let them dry overnight (I didn't want any mud!).
Step two: Cover the table with newspaper. That bag of charcoal had been sitting on a shelf in the HH basement for 20 years, I'm guessing, and it was
dirty! Also, well, giant bag of dirt + small-mouthed jar = likely disaster, at least when I'm involved.
 Step three: Place a layer of gravel in the bottom of your jar. This allows for drainage. You'll see here that I threw a small Ball jar into the mix (I got it for 25 cents at a rummage sale, gotta love that!). Don't bother using "pretty" gravel, like I did, because you're about to...
 Step four: Add the pretty-gravel-obscuring charcoal. The charcoal acts as a sort of filtration system for this mini ecosystem, but (surprise!) it's not the cleanest thing going. (Look how dirty it made my homemade funnel – just a piece of cardstock, really – over there on the left.) The charcoal was in small pieces and filtered down through the chinks in the gravel, obscuring the colours of the rocks. Next time I'll save my $3 and just steal some gravel from the bottom of someone's driveway.
 Step five: Add the soil. Make sure that you're using soil that's appropriate for the plants that you've chosen. Because I'd chosen a mix of succulents, I bought a bag of "cactus and succulent mix," which is sandier/drier than regular potting soil. My homemade funnel came in handy again as I poured in the dirt – I didn't want it to get stuck to the sides of the jars. The three layers should take up about a third of the height of the jar.
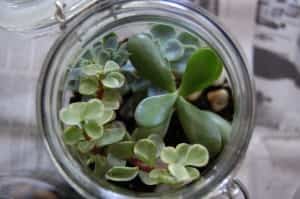
Step six: Add your plants. I shook the plants out of the dish they came in and gently separated them. I removed any dead/suspicious-looking leaves, then arranged them in little groups on the table until I found something I liked. I was going for a variety of heights and textures and wanted the plantings to be fairly dense. Keep in mind that the inside of the jar is smaller (and your hands are bigger) than you think. I ended up using the blunt end of a knitting needle to poke things into place.

Step seven: Add decorations. I was originally thinking "tiny plastic dinosaur!" but I'd run out of room for a T.rex. Instead, I added a bit more gravel on top to add some visual interest. Then I watered (sparingly), using a tiny jam jar and sticking my hand right down into the jar to prevent the water from splashing the sides with dirt.

Step eight: Line your terrariums up on a windowsill and admire. I left the lids open for a little while to dry things out (one of the jars got a little foggy). Don't keep your terrariums in direct sunlight because they'll get too hot and your plants could cook (think about the inside of a car on a hot day).
Any questions? Leave them in the comments and I'll see if I can help. Have you ever made a terrarium? Do you have any advice on how to keep mine alive? (I have a feeling that's going to be the hard part...) And don't forget to enter this week's contest!
Comments