
Baking & Desserts
Gingerbread project: Vintage Gingerbread Truck and Trees

Vintage Gingerbread Truck and Trees
Photography by Felix Wedgewood
Image by: Vintage Gingerbread Truck and Trees <br />Photography by Felix Wedgewood
Baking & Desserts
Gingerbread project: Vintage Gingerbread Truck and Trees
Vintage Gingerbread Truck and Trees
Prep: 5 minutes Chill: 40 minutes
Cook: 40 minutes Stand: 1 hour
Makes: 1 truck and about 24 trees
You’ll need three empty toilet paper rolls, halved lengthwise, for the base of the truck.
Ingredients:
Gingerbread Cookie Dough
Royal Icing
Green paste food colouring
Assorted candies
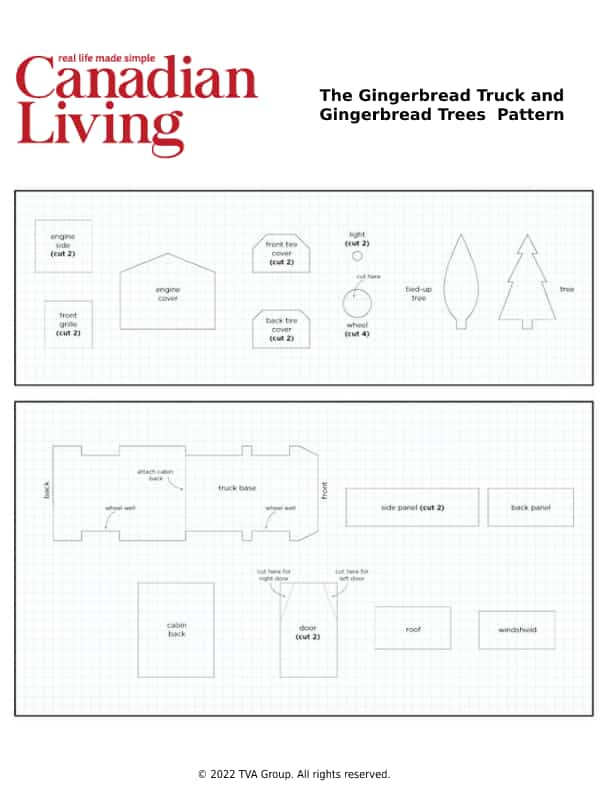
Download the Gingerbread Truck and Gingerbread Trees Pattern
Preparation:
Enlarge patterns (found on page 2) to make grid of 1-inch (2.5 cm) squares, or enlarge as follows: On parchment paper, draw grid of horizontal and vertical lines 1 inch (2.5 cm) apart. Each square on pattern grid equals 1-inch (2.5 cm) square on parchment paper. Draw each pattern line onto corresponding square on paper; cut out.
Between waxed paper, roll out 1 disc of dough at a time to -inch (5 mm) thickness. Peel off top paper; refrigerate until firm, about 15 minutes. With tip of sharp knife, trace and cut out pieces, rerolling and cutting scraps.
Slide dough and paper onto baking sheets; refrigerate until firm, about 20 minutes.
Grouping like sizes together, transfer as many gingerbread pieces as can fit, 1 inch (2.5 cm) apart, onto parchment paper–lined baking sheets. Bake, 1 sheet at a time, in 325 F (160 C) oven until firm to the touch, 12 to 15 minutes for small pieces, 20 to 25 minutes for large pieces.
While still warm, replace patterns and trim gingerbread to size if necessary. Transfer to rack and let cool. (Store in airtight container for up to 24 hours.)
Remove 1/3 cup (75 mL) icing to small bowl; tint green for trees. Cover with damp towel; set aside.
Place halved toilet paper rolls, cut sides down, on desired base; place truck base on top. Using piping bag fitted with plain tip, pipe white icing along inside straight edges of wheels; attach to wheel wells on truck base.
Pipe along 1 short edge of cabin back; attach to truck body, propping to support. Pipe along long edge and bottom edge of doors; attach to cabin back and truck base.
Pipe along 1 long edge of side panels and inside 1 short edge; attach panels to truck base and doors.
Pipe along 1 long edge and both short edges of back panel; attach to truck base and side panels.
Pipe along 1 long edge and inside 1 short edge of engine sides; attach to truck base and doors to overlap doors by about 1/2-inch (1 cm).
Pipe along 1 bottom edge and inside 1 side edge of front grille pieces; attach to truck base and engine sides. Pipe line up seam between front grille pieces to attach. Pipe along top edges of engine sides and front grille; attach engine cover.
Pipe along inside edges of windshield; attach to doors and engine cover. Pipe along top edges of windshield, doors and cabin back; attach roof piece.
Spread icing on back of front and back tire covers; attach to side panels (for back tire covers) and engine sides (for front tire covers) to overhang truck base by about 1/3 inch (8 mm). Spread icing on backs of lights; attach to front grille. Let dry, about 1 hour.
Using green icing and candies, decorate trees as desired. Using candies and remaining white icing, decorate truck as desired. Let dry until firm, about 3 hours.
Download the Gingerbread Truck and Gingerbread Trees Pattern
Comments