
DIY & Crafts
Hats for little heads

DIY & Crafts
Hats for little heads
Summer's here and so's the sunshine. Sew up some shade for that sweet baby face – it's easy. This season's crop of fabrics for children comes in a delicious bouquet of colours and prints. Start by shaping a simple six-part crown.Top it with a big, bright button, then add lacy little-girl trim, a tennis-style brim or a baseball player's peak. For back-of-the-neck protection, add a Foreign Legion-style flap. Designer Kathryn Lamb of Hudson, Que., shows you how.
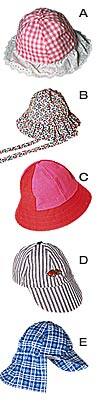
Click here to view the five different hat styles.
DESIGNER'S TIPS
• Hats are designed in sizes Small (S), Medium (M) and Large (L); finished crown circumferences are 50.5 cm/19-1/2 in, 54.5 cm/21-1/2 in and 57 cm/22-1/2 in, respectively.
• Measure child's head, then choose size that will be snug, not tight.
• To achieve correct size, use exact seam allowance called for.
• On hats for very small children, stitch on buttons and trim with sturdy buttonhole twist thread. Check periodically for looseness.
• Ask children to choose their favourite fabrics: that way they'll be sure to wear the finished hats.
Children's Sun Hats
You Need:
Download the pattern (PDF format requires free Adobe Acrobat Reader)
Cotton or polycotton fabric, 115 cm wide, as follows:
.40 m, for Hat A*
.70 m, for Hat B*
.80 m, for Hat C**
.70 m, for Hat D**
.60 m, for Hat E***
.30 m cotton or polycotton broadcloth or calico, 115 cm wide, for lining hats A, B, D and E
Piece of heavyweight fusible interfacing, 50 x 20 cm (19-3/4 x 7-7/8 in), for Hat C
.40 m heavyweight fusible interfacing, 115 cm wide for hats D and E
.60 m gathered eyelet trim, 57 to 76 mm (2-1/4 to 3 in) wide, for Hat A
.60 m grosgrain ribbon, 16 mm (5/8 in) wide, for hats A and C
.30 m double-fold bias binding, for Hat E
.30 m elastic, 6 mm wide, and bodkin or large safety pin, for Hat E
Matching thread
Buttonhole twist
Decorative or matching button
Sew-on appliqué(s), optional
* lightweight broadcloth or calico
** medium-weight denim, poplin or similar fabric
*** lightweight or medium-weight fabric
General Notes
Enlarge patterns photostatically to make grid of 2.5 cm (1-in) squares. Seam allowance of 6 mm (1/4 in) is included on all patterns. Stitch pieces together with right sides together, edges even and using 6 mm seam allowance, unless otherwise indicated. As you complete seams, clip or notch seam allowance at curves.
Hat A
1. From fabric, cut 6 crown pieces. Repeat with lining.
2. Stitch 3 crown pieces together in series, along side edges from tip to bottom edge to make each crown half, then stitch halves together along side edges to make crown. As you work, press trimmed seam allowance to right-hand side of each seam. With seams matching along sides, fold crown in half; at folds mark centre front and back with pins.
3. Stitch lining pieces together in same manner as crown pieces, leaving last seam open between notches, as indicated on pattern.
4. With seams matching and right sides together, pin lining to crown around bottom edge; stitch. Turn right side out; slipstitch opening closed.
5. At intersection of seams on tip, sew on button using buttonhole twist and catching lining in stitching. If desired, decorate crown with appliqué(s).
6. Stitch together ends of gathered eyelet trim; machine-zigzag seam allowance to bind. Fold in half along seam (centre back); at opposite fold, mark centre front with pin. Pin gathered edge of eyelet trim 6 mm up around wrong side of bottom edge of crown, matching centre fronts and backs and easing in fullness if necessary; baste.
7. Press under 6 mm along 1 end of ribbon. With bottom edges even, pin ribbon inside crown around bottom edge; overlap pressed end and slipstitch in place. Edgestitch bottom edge of ribbon. Remove any basting.
Hat B
1. From fabric, cut 6 crown pieces, 1 ruffle strip, 110 x 12.5 cm (43-1/4 x 5 in) and 2 ties, 47 x 5 cm (18-1/2 x 2 in). From lining, cut 6 crown pieces.
2. Stitch crown and lining, following steps 2 and 3 as given for Hat A.
3. With right sides together, fold each tie so long edges match; stitch long edge and 1 end. Turn right side out and press. With raw edges even, baste 1 tie end to right side of crown 10 cm (4 in) from centre back on each side.
4. Stitch together short edges of strip; press open seam allowance. With wrong sides together, fold strip so long edges match; press. Fold in half along seam (centre back); at opposite fold, mark centre front with pin. Run a line of gathering stitches through both layers along raw edge. With raw edges even and matching centre fronts and backs, pin strip to right side of crown, pulling up thread to form ruffle; baste.
Pin folded ruffle edge and loose tie ends to right side of crown to avoid catching them in next seam.
5. Finish, following Hat A, steps 4 and 5.
Hat C
1. From fabric, cut 6 crown pieces and 2 brims. From interfacing, cut 2 brims along dotted line on pattern.
2. Stitch crown, following Step 2 as given for Hat A. As you complete each seam, machine-zigzag notched raw edges of seam allowance, to bind; press to right-hand side of each seam, then turn right side up and edgestitch seam through all layers. At intersection of seams on tip, sew on button using buttonhole twist.
3. Centre 1 interfacing brim on wrong side of each fabric brim; fuse following manufacturer's directions. Stitch ends of each brim together; press open seam allowance. Stitch fabric brims together around outside edge. Turn right side out and press. Topstitch brim where indicated on pattern by red lines. Fold in half along seam (centre back); at opposite fold, mark centre front with pin. With raw edges even and matching centre fronts and backs, pin inside edge of brim to right side of crown; stitch.
4. Finish, following Hat A, Step 7.
Hat D
1. From fabric, cut 6 crown pieces and 2 peaks. From lining, cut 6 crown pieces. From interfacing, cut 2 peaks along dotted line on pattern.
2. Stitch crown and lining, following steps 2 and 3 as given for Hat A.
3. Centre 1 interfacing peak on wrong side of each fabric peak; fuse following manufacturer's directions. Stitch fabric peaks together around outside edge. Turn right side out and press. Topstitch peak 6 mm from outside edge, if desired. With raw edges even and matching centre fronts, pin inside edge of peak to right side of crown; stitch.
4. Finish, following Hat A, steps 4 and 5.
Hat E
1. From Fabric, cut 6 crown pieces, 2 peaks and 1 flap. From lining, cut 6 crown pieces. From interfacing cut 2 peaks along dotted line on pattern.
2. Stitch crown and lining, following steps 2 and 3 as given for Hat A.
3. Press under 6 mm twice along side and bottom edges of flap; topstitch. With raw edges even, and matching centre backs, pin top edge of flap to right side of crown; stitch. Pin topstitched flap edges to right side of crown to avoid catching them in seam joining lining to crown.
4. Stitch peak and sew to crown, following Step 3 as given for Hat D.
5. Finish, following Hat A, steps 4 and 5.
6. Press open centre fold of binding, then press under 6 mm at each end. With bottom edges even, centre binding across centre back and pin inside crown around bottom edge. Leaving ends open, stitch binding in place along long edges to make elastic casing. With bodkin, thread elastic through casing. Adjust elastic length to fit child's head, then stitch casing ends, securing elastic.
Comments