
DIY & Crafts
Knitting Skills: Learning How to Steek

DIY & Crafts
Knitting Skills: Learning How to Steek
Hi friends, This weekend I headed out to
The Purple Purl and spent a few hours with
Glenna C, learning how to
steek. Basically, steeking is a shortcut (with emphasis on "cut") – you knit your garment in the round, then use your trusty scissors to cut a hole wherever you need one. It's a common technique in Fair Isle and Scandinavian knitting patterns, a fast and easy way to add thumbholes to mittens, arm and neck holes to sweaters, and to make a pullover into a cardigan. I'm currently working on a new sweater – it's destined to be a cardigan, but I wanted to knit it in the round, because it's so much faster – and thought that this was the perfect time to get some steeking practice under my belt. First I made up some swatches. Then I didn't take any photos of them, because they took me forever (serves me right, leaving them till the day of) and I didn't want to be late for my class. Then I missed the bus, decided to walk, got lost, and was late anyway. Hmph. But I finally arrived, and I hadn't missed too much. It wasn't long before we were snipping away! When you're knitting a steeked garment, you add a few extra stitches in the area where you'll be cutting, and work them in alternating stripes (assuming you're working on a project with stranded colour work). When you're finished knitting, you have three options:
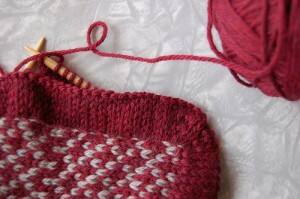
 ...you can cut the stitches without reinforcing your work (see above left, that's a right-side view);
 ...you can reinforce your work with a line of single crochet on either side of the cut (the crochet stitches are in red, above, and that's a wrong-side view);
 ...or you can reinforce your work with a line of machine stitching on either side of the cut (the machine stitches are in white, and that is a wrong-side view again). Each method has its pros and cons, and which one you use will likely be determined by the specifics of the project you're working on. The type of fibre you're using (wool is best!), how much wear and tear the area will need to endure, how much time you have (if you're a bad crocheter, like me, be prepared to spend some serious time on that single crochet!)...those are all factors to consider. The next step is to finish the edge. Again, there are multiple options, depending on the project and your materials, but we learned how to pick up stitches to create a two-sided, mitred facing. Here it is from the back:
 Notice how the steek naturally folds over. If that was destined to be an armhole or a button band, I'd probably tack it down to keep things neat and tidy, and not too bulky. Here it is from the front.
 I think this fella is destined to be a pot holder one day. Pretty neat, eh? I'm glad I tried this, and I'm looking forward to trying this on my sweater when the time comes. If you want to learn more,
Eunny Jang has written about it extensively (
start here); or try this
shorter primer by
Elinor here. Or do like I did and take a class at your LYS – it's worth it!
I think this fella is destined to be a pot holder one day. Pretty neat, eh? I'm glad I tried this, and I'm looking forward to trying this on my sweater when the time comes. If you want to learn more,
Eunny Jang has written about it extensively (
start here); or try this
shorter primer by
Elinor here. Or do like I did and take a class at your LYS – it's worth it!
...you can cut the stitches without reinforcing your work (see above left, that's a right-side view);
...you can reinforce your work with a line of single crochet on either side of the cut (the crochet stitches are in red, above, and that's a wrong-side view);
...or you can reinforce your work with a line of machine stitching on either side of the cut (the machine stitches are in white, and that is a wrong-side view again). Each method has its pros and cons, and which one you use will likely be determined by the specifics of the project you're working on. The type of fibre you're using (wool is best!), how much wear and tear the area will need to endure, how much time you have (if you're a bad crocheter, like me, be prepared to spend some serious time on that single crochet!)...those are all factors to consider. The next step is to finish the edge. Again, there are multiple options, depending on the project and your materials, but we learned how to pick up stitches to create a two-sided, mitred facing. Here it is from the back:
Notice how the steek naturally folds over. If that was destined to be an armhole or a button band, I'd probably tack it down to keep things neat and tidy, and not too bulky. Here it is from the front.
I think this fella is destined to be a pot holder one day. Pretty neat, eh? I'm glad I tried this, and I'm looking forward to trying this on my sweater when the time comes. If you want to learn more,
Eunny Jang has written about it extensively (
start here); or try this
shorter primer by
Elinor here. Or do like I did and take a class at your LYS – it's worth it!
Comments