
DIY & Crafts
Tutorial: Freezer Paper Stenciling

DIY & Crafts
Tutorial: Freezer Paper Stenciling
Hello!
Well, after a week of promises, here is the freezer paper stenciling tutorial. I took these pictures as I was making the "In Like a Lion" tote bag that appeared in our March 2010 issue. It was lots of fun! Here's how I did it.
[caption id="attachment_1356" align="aligncenter" width="297" caption="What you'll need."] [/caption]
1. First things first, assemble your tools. I found the
plain canvas tote bag, heat-set fabric paints and
paint brush at my local DeSerres. (Similar options are also available at Michaels, and probably at your local independent art store, too.) The
freezer paper is in the plastic wrap/foil aisle at the grocery store – you'll get something like 50 m for $4. I don't anticipate ever having to buy another roll. You'll also need a
pencil and eraser, a craft or
X-Acto knife,
plastic lids or paper plates and
paper towel. Cover your work surface with
kraft paper or newspaper; put your
iron on to preheat on medium-low (no steam). [caption id="attachment_1360" align="aligncenter" width="300" caption="Print out (or photocopy) your template"]
[/caption]
1. First things first, assemble your tools. I found the
plain canvas tote bag, heat-set fabric paints and
paint brush at my local DeSerres. (Similar options are also available at Michaels, and probably at your local independent art store, too.) The
freezer paper is in the plastic wrap/foil aisle at the grocery store – you'll get something like 50 m for $4. I don't anticipate ever having to buy another roll. You'll also need a
pencil and eraser, a craft or
X-Acto knife,
plastic lids or paper plates and
paper towel. Cover your work surface with
kraft paper or newspaper; put your
iron on to preheat on medium-low (no steam). [caption id="attachment_1360" align="aligncenter" width="300" caption="Print out (or photocopy) your template"]
 [/caption]
2. Prepare your template. This lion was drawn by one of our super-talented art directors, Miguel Cea. I made half a dozen
photocopies and then spent some time with my
pencil crayons to work out which areas I wanted to paint what colour. (You can download or photocopy the template that appears on page 147 of the March issue to your desired size and skip the colouring step!) [caption id="attachment_1361" align="aligncenter" width="300" caption="Colour in the areas you want to cut away, then tape the template to a sheet of freezer paper."]
[/caption]
2. Prepare your template. This lion was drawn by one of our super-talented art directors, Miguel Cea. I made half a dozen
photocopies and then spent some time with my
pencil crayons to work out which areas I wanted to paint what colour. (You can download or photocopy the template that appears on page 147 of the March issue to your desired size and skip the colouring step!) [caption id="attachment_1361" align="aligncenter" width="300" caption="Colour in the areas you want to cut away, then tape the template to a sheet of freezer paper."]
 [/caption]
3. Get ready to cut. When I was satisfied with the colour arrangement, I used strips of
masking tape to affix the template to a sheet of
freezer paper. (When working with freezer paper, remember this simple rule: shiny side down!) [caption id="attachment_1363" align="aligncenter" width="300" caption="Carefully cut out the coloured areas."]
[/caption]
3. Get ready to cut. When I was satisfied with the colour arrangement, I used strips of
masking tape to affix the template to a sheet of
freezer paper. (When working with freezer paper, remember this simple rule: shiny side down!) [caption id="attachment_1363" align="aligncenter" width="300" caption="Carefully cut out the coloured areas."]
 [/caption]
4. Cut out your stencil. Working on a
cutting mat or other protected surface, use your
X-Acto knife to cut out the coloured areas of the template, cutting through both layers of paper and leaving small "bridges" (they're marked on the diagram in the magazine) to ensure that you don't end up with loose bits.
Hints: Work from the inside out. Slow and steady wins the race. Don't use too much pressure. Be prepared to change blades. And
watch your fingers!! [caption id="attachment_1364" align="aligncenter" width="199" caption="Iron the stencil to the tote bag (shiny side down!)"]
[/caption]
4. Cut out your stencil. Working on a
cutting mat or other protected surface, use your
X-Acto knife to cut out the coloured areas of the template, cutting through both layers of paper and leaving small "bridges" (they're marked on the diagram in the magazine) to ensure that you don't end up with loose bits.
Hints: Work from the inside out. Slow and steady wins the race. Don't use too much pressure. Be prepared to change blades. And
watch your fingers!! [caption id="attachment_1364" align="aligncenter" width="199" caption="Iron the stencil to the tote bag (shiny side down!)"]
 [/caption]
5. Iron the stencil to the tote bag. Carefully separate the photocopied template from the freezer paper stencil (I just slit the tape with my knife) and position the stencil on the
tote bag as desired. Carefully smooth out the stencil, making sure there aren't any folds or curled edges. Working with a
medium-low iron (mine was at 2.5 out of 6) with the steam turned off, iron the stencil to the tote bag by placing the iron flat on the centre of the paper and holding in place for a count of ten. Slide the iron over and press again. Continue until you have ironed the entire stencil down. (The heat of the iron melts the plasticized side of the freezer paper, sticking the stencil to the fabric and forming a seal that will give you a crisp outline.) [caption id="attachment_1371" align="aligncenter" width="262" caption="Touch up the edges with your iron."]
[/caption]
5. Iron the stencil to the tote bag. Carefully separate the photocopied template from the freezer paper stencil (I just slit the tape with my knife) and position the stencil on the
tote bag as desired. Carefully smooth out the stencil, making sure there aren't any folds or curled edges. Working with a
medium-low iron (mine was at 2.5 out of 6) with the steam turned off, iron the stencil to the tote bag by placing the iron flat on the centre of the paper and holding in place for a count of ten. Slide the iron over and press again. Continue until you have ironed the entire stencil down. (The heat of the iron melts the plasticized side of the freezer paper, sticking the stencil to the fabric and forming a seal that will give you a crisp outline.) [caption id="attachment_1371" align="aligncenter" width="262" caption="Touch up the edges with your iron."]
 [/caption]
6. Touch up the edges. Use the
tip of the iron to touch up the edges, making sure there are no air bubbles or unsealed gaps (these might allow the paint to seep through, marring your crisp, clean lines). If necessary, use a
toothpick or metal cake skewer to pierce air bubbles or to lift up and reposition bits of paper (but you probably won't need to do this). Now, use your X-Acto knife to remove the "bridges" – I found it was enough to lightly press the blade down on either edge, then carefully pierce the piece of paper and remove it. [caption id="attachment_1365" align="aligncenter" width="199" caption="Pour your paint and load up your brush."]
[/caption]
6. Touch up the edges. Use the
tip of the iron to touch up the edges, making sure there are no air bubbles or unsealed gaps (these might allow the paint to seep through, marring your crisp, clean lines). If necessary, use a
toothpick or metal cake skewer to pierce air bubbles or to lift up and reposition bits of paper (but you probably won't need to do this). Now, use your X-Acto knife to remove the "bridges" – I found it was enough to lightly press the blade down on either edge, then carefully pierce the piece of paper and remove it. [caption id="attachment_1365" align="aligncenter" width="199" caption="Pour your paint and load up your brush."]
 [/caption]
7. Prepare your paint and brush. Make sure you've read the directions on your paint before you begin. Shake or stir your
paint to make sure it's well mixed, then pour a small amount onto one of the
plastic lids. To "load" the
brush, gently drop the bristles straight down into the paint two or three times (the bristles should be evenly covered). Blot the brush by dropping it onto a clean piece of
paper towel, as shown above. You will likely need to repeat this step several times as you work. [caption id="attachment_1366" align="aligncenter" width="199" caption="Paint the small, central parts first."]
[/caption]
7. Prepare your paint and brush. Make sure you've read the directions on your paint before you begin. Shake or stir your
paint to make sure it's well mixed, then pour a small amount onto one of the
plastic lids. To "load" the
brush, gently drop the bristles straight down into the paint two or three times (the bristles should be evenly covered). Blot the brush by dropping it onto a clean piece of
paper towel, as shown above. You will likely need to repeat this step several times as you work. [caption id="attachment_1366" align="aligncenter" width="199" caption="Paint the small, central parts first."]
 [/caption]
8. Start painting. Carefully
drop the brush onto the fabric until you've laid down an even layer of paint, reloading the brush as necessary. The paint should cover the fabric completely, but not so thickly that you can't see the texture of the fabric beneath (in other words, it shouldn't look as though you poured the paint on). Do not "brush" the paint up-and-down or side-to-side as if you were painting a wall – this could disturb the edges of the stencil.
Hints: Work from the centre outward, and from the top down. Turn the bag if that makes it easier. Use scraps of paper to "mask" areas that you want to be a different colour if you're worried about the brush slipping. [caption id="attachment_1367" align="aligncenter" width="300" caption="The bigger/outer parts come next."]
[/caption]
8. Start painting. Carefully
drop the brush onto the fabric until you've laid down an even layer of paint, reloading the brush as necessary. The paint should cover the fabric completely, but not so thickly that you can't see the texture of the fabric beneath (in other words, it shouldn't look as though you poured the paint on). Do not "brush" the paint up-and-down or side-to-side as if you were painting a wall – this could disturb the edges of the stencil.
Hints: Work from the centre outward, and from the top down. Turn the bag if that makes it easier. Use scraps of paper to "mask" areas that you want to be a different colour if you're worried about the brush slipping. [caption id="attachment_1367" align="aligncenter" width="300" caption="The bigger/outer parts come next."]
 [/caption]
9. Paint the second colour. Once your first colour is dry (in 15 to 20 minutes...perfect for a tea break!) apply the
second colour, following steps 7 and 8 for preparing your paint and brush, and for painting the remaining part of the stenciled design. Again, use scraps of paper to mask the black areas if you like. I found this resulted in nice clean lines. [caption id="attachment_1368" align="aligncenter" width="165" caption="Once the paint's dry, carefully peel off the paper. "]
[/caption]
9. Paint the second colour. Once your first colour is dry (in 15 to 20 minutes...perfect for a tea break!) apply the
second colour, following steps 7 and 8 for preparing your paint and brush, and for painting the remaining part of the stenciled design. Again, use scraps of paper to mask the black areas if you like. I found this resulted in nice clean lines. [caption id="attachment_1368" align="aligncenter" width="165" caption="Once the paint's dry, carefully peel off the paper. "]
 [/caption]
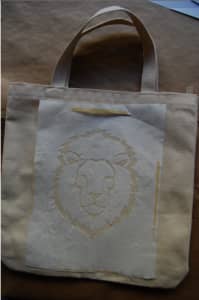
10. Dry the paint, peel off the stencil and set your work. I clipped the tote bag to a
pants hanger and hung it up in a traffic-free area of my home so that it could dry. After a couple of hours, I took it down and carefully peeled off the paper, revealing the picture you see above. Then, using a pressing cloth and a medium heat, no steam iron, I set the paint. (Consult the paint bottle for directions on how to set your brand of paint.)
11. Celebrate! Because you are done and done. Congratulations!
Some hints and tips:
[/caption]
10. Dry the paint, peel off the stencil and set your work. I clipped the tote bag to a
pants hanger and hung it up in a traffic-free area of my home so that it could dry. After a couple of hours, I took it down and carefully peeled off the paper, revealing the picture you see above. Then, using a pressing cloth and a medium heat, no steam iron, I set the paint. (Consult the paint bottle for directions on how to set your brand of paint.)
11. Celebrate! Because you are done and done. Congratulations!
Some hints and tips:
- For an excellent printing resource, look for a copy of Lena Corwin's book Printing by Hand: A Modern Guide to Printing with Handmade Stamps, Stencils, and Silk Screens. (And read a great Q+A with Lena here.)
- You can use just about any line drawing to make a stencil. Just make several copies of the image and play around with coloured pencils (as I did above) until you're happy with how it looks; then you're ready to start cutting!
- Another option? Be like Melissa and use craft punches (or even just a hole punch) to cut designs in the freezer paper.
- Or, for a quick and easy monogram, use a word-processing program to print your letter(s) in bold in your favourite font (make a statement with a 288 pt capital letter, or try a calmer 72 pt). Some printers will even print on (the dull side of) freezer paper if you cut it to fit.
- Freezer paper stencilling isn't just for tote bags. Use it to dress up just about anything, from a set of fabric coasters, to a quilt that needs a little pizzazz, to a plain T-shirt. I love the way Alabama Chanin uses stenciling as a prelude to reverse appliqué or beading.
- If you need more help, leave a question in the comments and I'll try to explain more. But keep in mind that this technique has been around the internet for a while, and a quick Google search will provide a bevy of answers to just about any freezer paper–related query. Good luck, and have fun!
Comments