
Knitting & Crochet
A simple tweed pullover to knit

Knitting & Crochet
A simple tweed pullover to knit
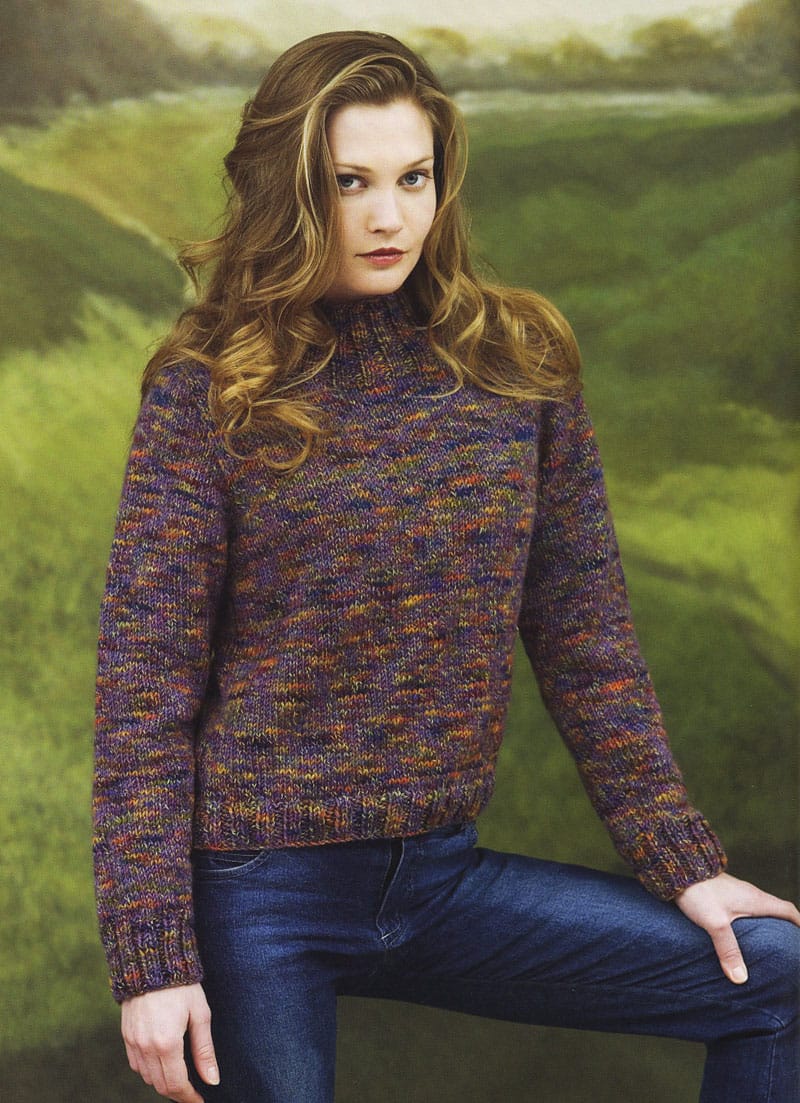
Tweed river pullover
This beautiful sweater is made not in traditional tweed but, rather, in a wool yarn with a lightly spun roving wrapped with two thin, solid strands and one thin, multi-colour strand. The quality of the 100 per cent wool will make this pullover a long-lasting favourite that you'll wear for years to come. It's a great sweater style for either a girl or a guy, and it comes in multiple sizes.
Take a look at a larger image of the finished sweater.
Sizes
Small (Medium, Large, 1X, 2X)
Knitted measurements
Bust: 34-1/2 (38, 42-1/2, 46, 50-1/2)" (87.5 [96.5, 108, 117, 128.5]cm)
Length: 21 (22, 23, 24, 24-1/2)" (51 [53.5, 56, 58.5, 59.5]cm)
Click to view pattern piece measurements
Materials
• 9 (10, 11, 12, 13) balls Tahki Yarns Shannon (100% wool, 1-3/4 oz [50g), 92 yd [84m]) in #21 lavender multi
• Size 7 (4.5mm) and size 9 (5.5mm) needles, or size needed to obtain gauge
• Size 7 (4.5mm) circular needle, 16" (40.5cm) long (for Circular version of neck band) (optional)
• Stitch markers
• Stitch holders
• Yarn needle
Gauge
18 sts and 24 rows = 4" (10cm) in stockinette stitch (St st), using the larger needles. Take time to check gauge.
Pattern stitches
K2, P2 rib
(multiple of 4 sts + 2 extra sts)
Row 1 (RS): K2, *p2, k2; repeat from * across.
Row 2: Knit the knit sts and purl the purl sts as they face you.
Repeat row 2 for k2, p2 rib.
St st
Knit on the right side, purl on the wrong side.
Note: For ease in working, circle the numbers that pertain to your size.
Page 1 of 3 -- Ready to get knitting? You'll find step-by-step instructions to get started on your pullover on page 2.
Back
Using the larger needles, cast on 78 (86, 94, 102, 114) sts.
(Right side) Begin k2, p2 rib; work even until the piece measures 1-1/2" (4cm) from the beginning, ending with a wrong-side row.
(Right side) Change to St st; work even until the piece measures 12-1/2 (13, 13-1/2, 14, 14)" (32 [33, 34.5, 35.5, 35.5]cm) from the beginning, ending with a wrong-side row.
Shape armhole
(Right side) Bind off 4 (4, 4, 5, 5) sts at the beginning of the next 2 rows, then 2 (3, 4, 4, 6) sts at the beginning of the next 2 rows – 66 (72, 78, 84, 92) sts remain.
(Right side) Decrease 1 st each side every other row 3 (4, 5, 6, 7) times – 60 (64, 68, 72, 78) sts remain.
Work even until the armhole measures 7-1/2 (8, 8-1/2, 9, 9-1/2)" (19 [20.5, 21.5, 23, 24]cm) from the beginning of the shaping, ending with a wrong-side row; place a marker at each side of the centre 22 (24, 26, 26, 28) sts.
Shape neck and shoulder
Right shoulder: With the right side facing, work across to the first marker; place the centre sts on a holder for the neck; place the remaining 19 (20, 21, 23, 25) sts on a separate holder for the left shoulder; turn.
(Wrong side) At the neck edge, bind off 3 sts, work to end, turn – 16 (17, 18, 20, 22) sts remain.
(Right side) At the shoulder edge, bind off 7 (8, 8, 9, 10) sts, work to end, turn – 9 (9, 10, 11, 12) sts remain.
(Wrong side) At the neck edge, bind off 2 sts, work to end, turn – 7 (7, 8, 9, 10) sts remain.
(Right side) At the shoulder edge, bind off the remaining sts.
Left shoulder: With the right side facing, place 19 (20, 21, 23, 25) sts from the left shoulder holder onto a needle, ready to work a right-side row; knit to end, turn.
(Wrong side) Work 1 row even, turn.
Work the shaping as for the right neck and shoulder, reversing the shaping by working the neck shaping at the beginning of the right-side rows and the shoulder shaping at the beginning of the wrong-side rows.
Front
Using the larger needles, cast on 78 (86, 94, 102, 114) sts.
Work as for the Back until the armhole measures 5 (5-1/2, 6 6-1/2, 7)" (12.5 [14, 15, 16.5, 18]cm) from the beginning of the shaping, ending with a wrong-side row – 60 (64, 68, 72, 78) sts remain; place a marker at each side of the centre 12 (14, 16, 16, 18) sts.
Shape neck
Left neck shaping: With the right side facing, work across to the marker; place the centre stitches on a holder for the neck; place the remaining 24 (25, 26, 28, 30) sts on a separate holder for the right neck and shoulder, turn.
(Wrong side) At the neck edge, bind off 3 sts, work to end, turn – 21 (22, 23, 25, 27) sts remain.
(Right side) Work 1 row even.
(Wrong side) At the neck edge, bind off 2 sts, work to end, turn – 19 (20, 21, 23, 25) sts remain.
(Right side) Work 1 row even.
(Wrong side) At the neck edge, decrease 1 st every other row 5 times, working the armhole edge (right-side rows) even – 14 (15, 16, 18, 20) sts remain. Work even until the armhole measures the same as the Back to the beginning of the shoulder shaping, ending with a wrong-side row.
Page 2 of 3 -- Learn how to finish this easy beginners sweater on page 3.
Shape shoulder
(Right side) At the shoulder edge, bind off 7 (8, 8, 9, 10) sts, work to end, turn – 7 (7, 8, 9, 10) sts remain.
(Wrong side) Work 1 row even.
(Right side) Bind off the remaining sts.
Right neck shaping: With the right side facing, place 24 (25, 26, 28, 30) sts from the right neck and shoulder holder on a needle, ready to work a right-side row; knit to end, turn.
(Wrong side) Work 1 row even, turn.
Work the shaping as for the left neck, reversing the shaping by working decreases at the beginning of the right-side rows. Work even until the armhole measures the same as the Back to the beginning of the shoulder shaping, ending with a right-side row.
Shape shoulder
(Wrong side) At the shoulder edge, bind off 7 (8, 8, 9, 10) sts, work to end, turn – 7 (7, 8, 9, 10) sts remain.
(Right side) Work 1 row even.
(Wrong side) Bind off the remaining sts.
Sleeves (make 2)
Using the smaller needles, cast on 42 (46, 46, 50, 50) sts.
(Right side) Begin k2, p2 rib, ending k2; work even until the piece measures 2-3/4" (7cm) from the beginning, ending with a wrong-side row.
(Right side) Changing to the larger needles and St st, work even for 8 (8, 6, 6, 8) rows, ending with a wrong-side row.
Shape sleeve
(Right side) Continue in St st; beginning this row, increase 1 st each side every 8 (8, 8, 8, 6) rows 9 (9, 11, 11, 13) times, working the increased sts in St st – 60 (64, 68, 72, 76) sts.
Work even until the piece measures 17 (17-1/2, 18, 18, 18)" (43 [44.5, 45.5, 45.5, 45.5]cm) from the beginning, ending with a wrong-side row.
Shape cap
(Right side) Bind off 4 (4, 4, 5, 5) sts at the beginning of the next 2 rows, then 2 (3, 4, 4, 6) sts at the beginning of the next 2 rows – 48 (50, 52, 54, 54) sts remain.
(Right side) Decrease 1 st each side every other row 15 times – 18 (20, 22, 24, 24) sts remain.
(Right side) Bind off 3 (4, 5, 6, 6) sts at the beginning of the next 2 rows – 12 sts remain.
Bind off the remaining sts.
Finishing
Block the pieces to the measurements.
Neck band (seamed version)
Sew the right shoulder seam.
With the right side facing, using the smaller needles, join the yarn at the left Front shoulder; pick up and knit 17 sts down the left neck shaping; knit 12 (14, 16, 16, 18) sts from the Front holder; pick up and knit 16 sts up the right Front neck shaping to the shoulder; pick up and knit 5 sts along the Back neck to the holder; knit 22 (24, 26, 26, 28) sts from the holder; pick up and knit 6 sts to the left shoulder – 78 (82, 86, 86, 90) sts.
(Wrong side) Beginning and ending p2, work even in k2, p2 rib until the neck band measures 3-1/2" (9cm) from the pickup row, ending with a wrong-side row.
Bind off all sts loosely in rib.
Sew the left shoulder and neck band seam.
Neck band (circular version)
Sew the shoulder seams.
With the right side facing, using the circular needle, pick up and knit 76 (80, 84, 84, 88) sts evenly around the neck shaping, including the sts on holders; place a marker for the beginning of the round. (Refer to the instructions above for the seamed version as a guide to picking up the stitches.)
Begin k2, p2 rib; work even until the neck band measures 3-1/2" (9cm) from the pickup round.
Bind off the remaining sts loosely in rib.
Set in the Sleeves, matching the shaping; sew the side and sleeve seams.
Using the yarn needle, weave in all ends.
Do you love crafts? Sign up to get our free e-newsletter, Get Crafty.
 Excerpted from
Tweed: More Than 20 Contemporary Designs to Knit, copyright 2008 by Nancy J. Thomas. Excerpted with permission from Potter Craft, a division of Random House, Inc. All rights reserved. No part of this excerpt may be reproduced except with permission in writing from the publisher.
Excerpted from
Tweed: More Than 20 Contemporary Designs to Knit, copyright 2008 by Nancy J. Thomas. Excerpted with permission from Potter Craft, a division of Random House, Inc. All rights reserved. No part of this excerpt may be reproduced except with permission in writing from the publisher.
Page 3 of 3
This beautiful sweater is made not in traditional tweed but, rather, in a wool yarn with a lightly spun roving wrapped with two thin, solid strands and one thin, multi-colour strand. The quality of the 100 per cent wool will make this pullover a long-lasting favourite that you'll wear for years to come. It's a great sweater style for either a girl or a guy, and it comes in multiple sizes.
Take a look at a larger image of the finished sweater.
Sizes
Small (Medium, Large, 1X, 2X)
Knitted measurements
Bust: 34-1/2 (38, 42-1/2, 46, 50-1/2)" (87.5 [96.5, 108, 117, 128.5]cm)
Length: 21 (22, 23, 24, 24-1/2)" (51 [53.5, 56, 58.5, 59.5]cm)
Click to view pattern piece measurements
Materials
• 9 (10, 11, 12, 13) balls Tahki Yarns Shannon (100% wool, 1-3/4 oz [50g), 92 yd [84m]) in #21 lavender multi
• Size 7 (4.5mm) and size 9 (5.5mm) needles, or size needed to obtain gauge
• Size 7 (4.5mm) circular needle, 16" (40.5cm) long (for Circular version of neck band) (optional)
• Stitch markers
• Stitch holders
• Yarn needle
Gauge
18 sts and 24 rows = 4" (10cm) in stockinette stitch (St st), using the larger needles. Take time to check gauge.
Pattern stitches
K2, P2 rib
(multiple of 4 sts + 2 extra sts)
Row 1 (RS): K2, *p2, k2; repeat from * across.
Row 2: Knit the knit sts and purl the purl sts as they face you.
Repeat row 2 for k2, p2 rib.
St st
Knit on the right side, purl on the wrong side.
Note: For ease in working, circle the numbers that pertain to your size.
Page 1 of 3 -- Ready to get knitting? You'll find step-by-step instructions to get started on your pullover on page 2.
Back
Using the larger needles, cast on 78 (86, 94, 102, 114) sts.
(Right side) Begin k2, p2 rib; work even until the piece measures 1-1/2" (4cm) from the beginning, ending with a wrong-side row.
(Right side) Change to St st; work even until the piece measures 12-1/2 (13, 13-1/2, 14, 14)" (32 [33, 34.5, 35.5, 35.5]cm) from the beginning, ending with a wrong-side row.
Shape armhole
(Right side) Bind off 4 (4, 4, 5, 5) sts at the beginning of the next 2 rows, then 2 (3, 4, 4, 6) sts at the beginning of the next 2 rows – 66 (72, 78, 84, 92) sts remain.
(Right side) Decrease 1 st each side every other row 3 (4, 5, 6, 7) times – 60 (64, 68, 72, 78) sts remain.
Work even until the armhole measures 7-1/2 (8, 8-1/2, 9, 9-1/2)" (19 [20.5, 21.5, 23, 24]cm) from the beginning of the shaping, ending with a wrong-side row; place a marker at each side of the centre 22 (24, 26, 26, 28) sts.
Shape neck and shoulder
Right shoulder: With the right side facing, work across to the first marker; place the centre sts on a holder for the neck; place the remaining 19 (20, 21, 23, 25) sts on a separate holder for the left shoulder; turn.
(Wrong side) At the neck edge, bind off 3 sts, work to end, turn – 16 (17, 18, 20, 22) sts remain.
(Right side) At the shoulder edge, bind off 7 (8, 8, 9, 10) sts, work to end, turn – 9 (9, 10, 11, 12) sts remain.
(Wrong side) At the neck edge, bind off 2 sts, work to end, turn – 7 (7, 8, 9, 10) sts remain.
(Right side) At the shoulder edge, bind off the remaining sts.
Left shoulder: With the right side facing, place 19 (20, 21, 23, 25) sts from the left shoulder holder onto a needle, ready to work a right-side row; knit to end, turn.
(Wrong side) Work 1 row even, turn.
Work the shaping as for the right neck and shoulder, reversing the shaping by working the neck shaping at the beginning of the right-side rows and the shoulder shaping at the beginning of the wrong-side rows.
Front
Using the larger needles, cast on 78 (86, 94, 102, 114) sts.
Work as for the Back until the armhole measures 5 (5-1/2, 6 6-1/2, 7)" (12.5 [14, 15, 16.5, 18]cm) from the beginning of the shaping, ending with a wrong-side row – 60 (64, 68, 72, 78) sts remain; place a marker at each side of the centre 12 (14, 16, 16, 18) sts.
Shape neck
Left neck shaping: With the right side facing, work across to the marker; place the centre stitches on a holder for the neck; place the remaining 24 (25, 26, 28, 30) sts on a separate holder for the right neck and shoulder, turn.
(Wrong side) At the neck edge, bind off 3 sts, work to end, turn – 21 (22, 23, 25, 27) sts remain.
(Right side) Work 1 row even.
(Wrong side) At the neck edge, bind off 2 sts, work to end, turn – 19 (20, 21, 23, 25) sts remain.
(Right side) Work 1 row even.
(Wrong side) At the neck edge, decrease 1 st every other row 5 times, working the armhole edge (right-side rows) even – 14 (15, 16, 18, 20) sts remain. Work even until the armhole measures the same as the Back to the beginning of the shoulder shaping, ending with a wrong-side row.
Page 2 of 3 -- Learn how to finish this easy beginners sweater on page 3.
Shape shoulder
(Right side) At the shoulder edge, bind off 7 (8, 8, 9, 10) sts, work to end, turn – 7 (7, 8, 9, 10) sts remain.
(Wrong side) Work 1 row even.
(Right side) Bind off the remaining sts.
Right neck shaping: With the right side facing, place 24 (25, 26, 28, 30) sts from the right neck and shoulder holder on a needle, ready to work a right-side row; knit to end, turn.
(Wrong side) Work 1 row even, turn.
Work the shaping as for the left neck, reversing the shaping by working decreases at the beginning of the right-side rows. Work even until the armhole measures the same as the Back to the beginning of the shoulder shaping, ending with a right-side row.
Shape shoulder
(Wrong side) At the shoulder edge, bind off 7 (8, 8, 9, 10) sts, work to end, turn – 7 (7, 8, 9, 10) sts remain.
(Right side) Work 1 row even.
(Wrong side) Bind off the remaining sts.
Sleeves (make 2)
Using the smaller needles, cast on 42 (46, 46, 50, 50) sts.
(Right side) Begin k2, p2 rib, ending k2; work even until the piece measures 2-3/4" (7cm) from the beginning, ending with a wrong-side row.
(Right side) Changing to the larger needles and St st, work even for 8 (8, 6, 6, 8) rows, ending with a wrong-side row.
Shape sleeve
(Right side) Continue in St st; beginning this row, increase 1 st each side every 8 (8, 8, 8, 6) rows 9 (9, 11, 11, 13) times, working the increased sts in St st – 60 (64, 68, 72, 76) sts.
Work even until the piece measures 17 (17-1/2, 18, 18, 18)" (43 [44.5, 45.5, 45.5, 45.5]cm) from the beginning, ending with a wrong-side row.
Shape cap
(Right side) Bind off 4 (4, 4, 5, 5) sts at the beginning of the next 2 rows, then 2 (3, 4, 4, 6) sts at the beginning of the next 2 rows – 48 (50, 52, 54, 54) sts remain.
(Right side) Decrease 1 st each side every other row 15 times – 18 (20, 22, 24, 24) sts remain.
(Right side) Bind off 3 (4, 5, 6, 6) sts at the beginning of the next 2 rows – 12 sts remain.
Bind off the remaining sts.
Finishing
Block the pieces to the measurements.
Neck band (seamed version)
Sew the right shoulder seam.
With the right side facing, using the smaller needles, join the yarn at the left Front shoulder; pick up and knit 17 sts down the left neck shaping; knit 12 (14, 16, 16, 18) sts from the Front holder; pick up and knit 16 sts up the right Front neck shaping to the shoulder; pick up and knit 5 sts along the Back neck to the holder; knit 22 (24, 26, 26, 28) sts from the holder; pick up and knit 6 sts to the left shoulder – 78 (82, 86, 86, 90) sts.
(Wrong side) Beginning and ending p2, work even in k2, p2 rib until the neck band measures 3-1/2" (9cm) from the pickup row, ending with a wrong-side row.
Bind off all sts loosely in rib.
Sew the left shoulder and neck band seam.
Neck band (circular version)
Sew the shoulder seams.
With the right side facing, using the circular needle, pick up and knit 76 (80, 84, 84, 88) sts evenly around the neck shaping, including the sts on holders; place a marker for the beginning of the round. (Refer to the instructions above for the seamed version as a guide to picking up the stitches.)
Begin k2, p2 rib; work even until the neck band measures 3-1/2" (9cm) from the pickup round.
Bind off the remaining sts loosely in rib.
Set in the Sleeves, matching the shaping; sew the side and sleeve seams.
Using the yarn needle, weave in all ends.
Do you love crafts? Sign up to get our free e-newsletter, Get Crafty.
Excerpted from
Tweed: More Than 20 Contemporary Designs to Knit, copyright 2008 by Nancy J. Thomas. Excerpted with permission from Potter Craft, a division of Random House, Inc. All rights reserved. No part of this excerpt may be reproduced except with permission in writing from the publisher.
Page 3 of 3
Comments