
DIY & Crafts
Neck or Nothing: DIY fleece-lined bibbed cowl

DIY & Crafts
Neck or Nothing: DIY fleece-lined bibbed cowl

...to replace the two scarves your child has already lost.
If you have children you know that although winter accessories are generally deemed to be virtually disposable items, it’s almost impossible to find replacement winter hats/mitts/scarves in stores beyond the New Year unless you’re willing to drop a bundle. Not to worry, with this easy-to-use pattern you can turn out a cozy winter cowl in under 45 minutes with very limited sewing skills required. This one cost under $10 to make with enough leftover fabric to make an extra double-sided scarf or a straight cowl without a bib! The extended bib design provides additional snug coverage to ward against drafts and drips coming in through the coat collar. See how it covers the section left exposed by the v of the collar? Anyone who's been hit in the back of the head with a hand-full of wet snow before ( brothers, anybody?) will definitely appreciate the benefits of the longer bib down the back as well!Want to make one? (or more)
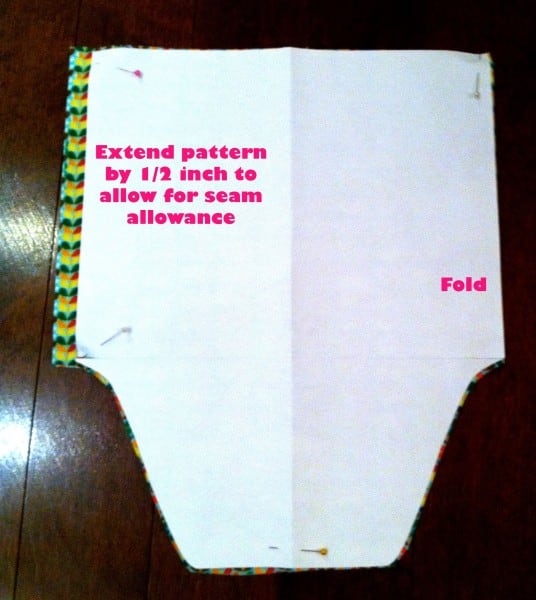
You Will Need:- ½ meter fleece
- ½ meter flannelette or quilting cotton
- 2 pieces of 8.5 X 11” paper
- Coordinating thread, pins, scissors, ruler.
 Step 3: You should have two fabric pieces that look like this.
 Step 4: With right sides facing, pin pattern pieces together along the top straight edge and the bottom bibbed edge.
 Step 5: Sew top and bottom with a 3/8-inch seam allowance and serge or zigzag stitch to finish your seams.
 Step 6: Turn your tube right side out.
 You should have a long tube with open short ends. Make shallow vertical cuts along the curves in the seam allowance, being careful not to cut through your seam.
Step 7: take one short, open end and turn it inside out along the length of the tube until you reach the other end.
You should have a long tube with open short ends. Make shallow vertical cuts along the curves in the seam allowance, being careful not to cut through your seam.
Step 7: take one short, open end and turn it inside out along the length of the tube until you reach the other end.
 Step 8: Pin the open edges together with right sides facing, fleece to fleece and flannel/cotton to flannel/cotton.
 Step 9: Sew around the ring with a ½-inch seam allowance, leaving a 2-inch gap in the middle of the fleece side.
 Step 10: Turn the cowl right side out through the 2-inch gap.
 Step 11: Hand-sew the gap closed with blind stitches or use a machine to close the gap.
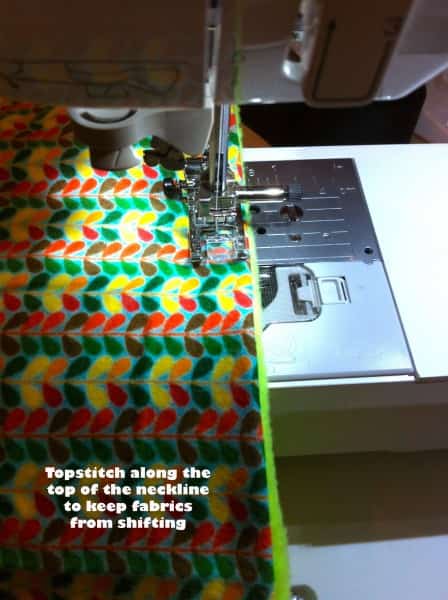
 Step 12: Optional: Topstitch along the top neck edge for a nice finish that will keep both fabrics neatly in place.


Wear and be warm!
[caption id="attachment_12706" align="aligncenter" width="532"] I love this extra soft Orla Kiely-inspired flannel I found at Fabricland![/caption] [caption id="attachment_12705" align="aligncenter" width="471"]
 The cowl is tall enough for her to disappear into when the wind blows too cold.[/caption] [caption id="attachment_12708" align="aligncenter" width="448"]
 Her brother got one too. You can get a good idea of how far down the bib extends.[/caption] [caption id="attachment_12690" align="aligncenter" width="472"]
 Keep warm![/caption]
Comments